Fouling does not announce itself. It shows up as lost production.
The outlet temperature drops. Pressure drop rises. Pumps work harder. Steam or cooling water demand climbs. If you wait too long, tubes plug, gaskets leak, and the bundle may crack.
Cleaning a shell and tube heat exchanger is not just maintenance. It restores heat transfer, cuts energy cost, and protects the equipment from permanent damage.
Here is a practical guide to cleaning shell and tube heat exchangers when fouling and blockage become a problem.
First, Confirm It Is Fouling—Not a Process Problem
Before you open the exchanger, check the data.
Look for:
Rising pressure drop on the tube side or shell side
Falling outlet temperature
Higher steam, cooling water, or pump energy use
Flow imbalance between parallel exchangers
Vibration or unusual noise
Visible scale, sludge, biofilm, coke, or polymer at nozzles
Compare current readings with design conditions and the last clean baseline. Check instruments, valves, bypass lines, and air pockets. If the data points to fouling, plan the cleaning method based on the deposit type.
Know Your Fouling Type
The deposit tells you how to clean it. Using the wrong method can damage tubes or leave the blockage in place.
| Fouling Type | Where It Forms | Typical Cleaning Method |
|---|---|---|
| Mineral scale | Tube side, cooling water side | Inhibited acid cleaning, hydrojetting |
| Biofilm / slime | Cooling water side | Biocide wash, caustic cleaning, hydrojetting |
| Organic deposits | Process side | Solvent, caustic, steam, thermal cleaning |
| Coke / polymer | High-temperature process side | Thermal cleaning, hydrojetting, off-site baking |
| Sediment / sludge | Low-velocity areas, shell side | Flushing, hydrojetting, mechanical rodding |
| Wax / grease | Process side | Steam, hot oil, solvent circulation |
Safety and Preparation Before Any Cleaning
Heat exchanger cleaning can be dangerous. Treat every unit as if it still contains pressure, chemicals, or flammable gas.
Minimum preparation:
Lockout/tagout all pumps, valves, and agitators
Depressurize, drain, and cool the exchanger
Purge flammable or toxic gases
Use confined space permits when entering shells or channels
Wear correct PPE for chemicals, pressure, and temperature
Review SDS for every cleaning chemical
Confirm compatibility with tubes, shell, gaskets, and seals
Have a neutralization and waste disposal plan
Never mix cleaning chemicals without checking compatibility. Acid plus caustic, or acid plus oxidizer, can create heat, toxic gas, or corrosion.
Tube Side Cleaning Methods
Tube side fouling is usually easier to reach. The straight tube bore allows more options.
Hydrojetting
High-pressure water jetting is the workhorse for scale, sludge, and soft deposits. A rotating nozzle moves through each tube and blasts the deposit away.
Use the lowest pressure that removes the deposit. Too much pressure can erode tube walls, especially in copper, brass, or thin stainless tubes. Start low and adjust.
Mechanical Cleaning
Brushes, reamers, and scrapers work well for hard scale and packed solids.
Nylon or brass brushes for soft deposits
Stainless brushes for harder scale
Reamers for heavy plugging
Never use carbon steel brushes on stainless steel tubes. It can leave carbon contamination and cause corrosion. Keep the tool centered. Do not force it through a blocked tube.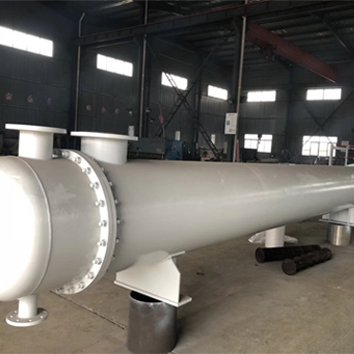
Chemical Cleaning / CIP
Chemical cleaning is effective when circulation is possible.
Acid cleaning for mineral scale
Caustic cleaning for organics, grease, and biofilm
Solvent cleaning for polymers, resins, and wax
Biocide wash for biological growth
Use corrosion inhibitors. Control temperature and concentration. Circulate, soak, flush, neutralize, and rinse. Vent the system properly. Check pH and iron levels before discharge.
Thermal Cleaning
Steam, hot oil, or hot water can melt wax, grease, and some polymers. This is often a pre-treatment before hydrojetting. Watch tube and gasket temperature limits.
Pigging
Foam pigs or abrasive pigs can clean long, straight tubes. They are less common in complex exchangers but useful for pipelines and some tube bundles.
Shell Side Cleaning Methods
Shell side cleaning is harder. The bundle, baffles, and shell create tight spaces where deposits collect.
If the exchanger has a removable bundle, pull it for proper cleaning. Then use:
Hydroblasting
Chemical soak or circulation
Steam cleaning
Manual brushing where accessible
Do not bend tubes. Do not damage baffles or tube supports. If the bundle is fixed, chemical circulation and flushing may be the only safe options.
Method Selection by Fouling
Use this as a starting point. Always verify with operating data and material compatibility.
| Problem | Best First Method | Backup Method |
|---|---|---|
| Hard water scale | Inhibited acid CIP | Hydrojetting |
| Sludge / sediment | Flush then hydrojet | Mechanical rodding |
| Biofilm | Biocide + caustic | Hydrojetting |
| Coke | Thermal + hydrojet | Off-site baking |
| Polymer | Solvent soak | Thermal + hydrojet |
| Wax / grease | Steam or hot oil | Solvent circulation |
| Severe tube plugging | Mechanical reaming | Replace tubes or bundle |
On-Site vs Off-Site Cleaning
On-site cleaning saves time if the exchanger is small, safe, and easy to isolate. It works well for chemical CIP and tube side hydrojetting.
Off-site cleaning is better when:
The bundle is heavy or hard to remove
Deposits are hazardous or flammable
Thermal cleaning or baking is required
Tubes are severely plugged
Precision cleaning or inspection is needed
Off-site cleaning often includes inspection, tube plugging, retubing, and pressure testing.
How to Avoid Damage During Cleaning
Most heat exchanger damage happens during cleaning, not operation.
Avoid these mistakes:
Exceeding tube pressure limits
Using the wrong brush material
Forcing reamers through blocked tubes
Mixing incompatible chemicals
Leaving acid in the exchanger too long
Reusing old gaskets
Over-torquing or under-torquing bolts
Skipping the final pressure test
After cleaning, inspect tubes, gaskets, and baffles. Replace worn parts. Torque bolts to spec. Pressure test before returning to service.
Prevention That Actually Works
The best cleaning method is the one you need less often.
Maintain water treatment and chemical dosing
Install filters and strainers upstream
Keep flow velocity within design range
Avoid low-flow dead zones
Use online cleaning systems where possible
Schedule CIP based on pressure drop, not calendar
Monitor corrosion coupons and water chemistry
Keep a spare bundle for critical exchangers
Track pressure drop and outlet temperature every shift. When pressure drop rises 20–30% above baseline, plan cleaning before production suffers.
When to Call a Heat Exchanger Specialist
Call a specialist if:
Tubes are plugged and cannot be cleared
The bundle is damaged or leaking
Fouling returns quickly after cleaning
The exchanger cannot meet duty after cleaning
You need a replacement bundle or a fouling-resistant redesign
Sometimes cleaning is not enough. Wider tube spacing, enhanced tubes, better materials, or a different exchanger type may solve the root cause.